

How Do I Replace Mtly Camera And Battery On My Note 5
Introduction
Follow this guide to remove and replace the bombardment in your Samsung Galaxy Note5.
Before disassembling your phone, belch the battery below 25%. A charged lithium-ion battery can catch fire and/or explode if accidentally punctured.
If your bombardment is swollen, have appropriate precautions. Do not oestrus your phone. If needed, y'all can utilise a dropper or syringe to inject isopropyl alcohol (90+%) around the edges of the dorsum cover to weaken the adhesive. Bloated batteries can be very dangerous, so wear heart protection and exercise due caution, or take it to a professional if yous're non sure how to proceed.
Later on completing this guide, calibrate your newly-installed bombardment.
-
-
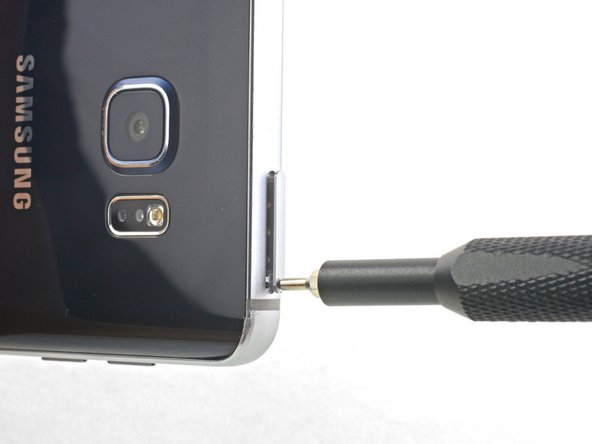
Insert a SIM eject tool, SIM eject flake, or a straightened paperclip into the pocket-size hole in the SIM card tray at the top of the phone.
-
Press to squirt the tray. This may require some strength.
-
Remove the SIM card tray.
-
-
-
Using your fingernail, push the S-Pen push until it clicks and pops out of the phone.
-
Remove the S-Pen.
-
-
-
Apply a heated iOpener to the bottom of the telephone for about two minutes.
-
-
-
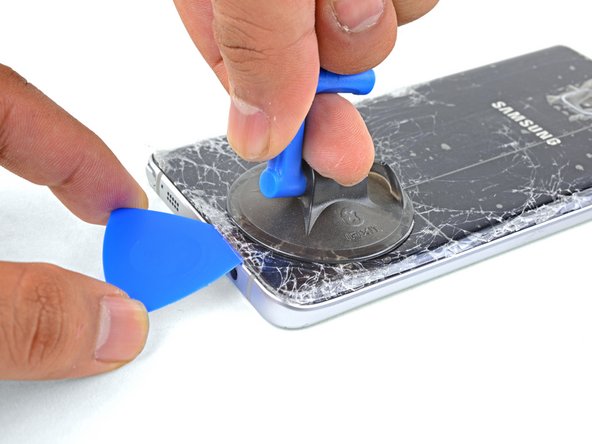
Apply a suction loving cup as close as possible to the bottom edge of the telephone.
-
Lift on the suction cup and insert an opening selection nether the rear glass.
-
-
-
One time the selection is in place, reheat the edge with an iOpener for some other infinitesimal.
-
-
-
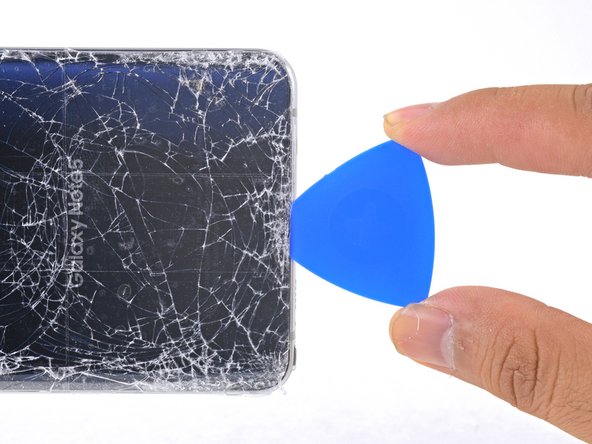
Slide the pick downward the bottom edge of the phone.
-
Leave the pick in place to prevent the agglutinative from resealing, and grab some other option as you proceed to the next step.
-
-
-
Insert another pick and slowly cut around the corner of the phone.
-
-
-
Before cut farther, employ a heated iOpener to the long edge.
-
-
-
Echo the previous heating and cutting procedure for the remaining 3 sides of the telephone.
-
Leave an opening pick in each edge of the phone as you keep to the side by side to prevent the adhesive from resealing.
-
-
-
Utilise an opening pick to cutting any remaining agglutinative effectually the edges of the glass.
-
Lift the drinking glass and remove information technology from the phone.
-
-
-
Use tweezers to peel abroad any remaining adhesive from both the back cover and the telephone's chassis.
-
Clean the adhesion areas with loftier concentration isopropyl alcohol (at least ninety%) and a lint-costless fabric. Swipe in ane direction only, not dorsum and forth. This volition assistance prep the surface for the new adhesive.
-
Be certain to turn on your phone and examination your repair before installing new adhesive and resealing the telephone.
-
After installing the rear cover, apply strong, steady pressure to your phone for several minutes to help the adhesive grade a expert bond, such as past placing it nether a stack of heavy books.
-
-
-
Remove the twenty 3.3 mm Phillips screws.
-
-
-
Hold the midframe past the edges and elevator it upwardly while pushing down confronting the battery with one finger.
-
Remove the midframe.
-
-
-
Using the flat cease of a spudger, lift the battery connector straight up from its socket on the motherboard.
-
-
-
Slide an opening pick under the bottom edge of the bombardment to slowly pry it upwards from the example.
-
-
-
Slide an opening option up the side of the battery to interruption apart any remaining adhesive.
-
-
-
Lift the battery out of the case.
-
Remove whatsoever remaining adhesive from the phone, and clean the glued areas with isopropyl alcohol and a lint-free cloth.
-
Secure the new battery with pre-cut adhesive or double-sided adhesive record. In social club to position it correctly, apply the new adhesive into the phone, non directly onto the battery. The adhesive should go around the perimeter of the battery compartment, but not in the rectangular cutout in the heart (which is actually the back side of the display).
-
Press the battery firmly into place for 5-10 seconds.
-


Decision
Compare your new replacement office to the original part. You may need to transfer remaining components or remove agglutinative backings from the new office earlier installing.
To reassemble your device, follow the above steps in reverse order. Take your eastward-waste product to an R2 or east-Stewards certified recycler.
Repair didn't get equally planned? Check out our Answers community for troubleshooting assistance.
Embed this guide
Choose a size and copy the code beneath to embed this guide as a small widget on your site / forum.
Preview
Source: https://www.ifixit.com/Guide/Samsung+Galaxy+Note5+Battery+Replacement/51173
Posted by: monroebleenter.blogspot.com
0 Response to "How Do I Replace Mtly Camera And Battery On My Note 5"
Post a Comment